
According to Prof. Google you will spend about three years of your life on the toilet. If you are like most of us, this time is usually spent in a higher order of thought, a chance to reflect on our lives and very existence. Surely you can spare just a few of those moments to look downward and make a quick check of the modern marvel that makes it all possible.
What we are looking for here are signs of leakage. While some of these issues may be obvious, others require just a bit of detective work. Even the smallest water loss can add up up quickly, giving you a double pain in the wallet. The water itself is not free, and repairs associated with moisture damage can be costly! Add to that the fact that moisture can contribute to conditions perfect for fungal growth, including mold, and you probably don't need too much more convincing that this is serious stuff. So, what do we look for?
- The first thing I do when inspecting a toilet is look for the obvious. Are there visible cracks in the bowl or tank? Is moisture evident on the floor around the stool? No? Let's keep looking.
- Flush the toilet. Does the toilet run constantly or intermittently, even when not flushed? Not only is this money down the drain, it can be indicitive of a leak. Additionally, if your home has a well, continuously running toilets can cause the well to run dry and the pump to burn out. That's bad.
- Check for loose connections. Here's how I do it: Close the lid and straddle the toilet, facing the wall. Grab the tank and give it a wiggle. It may give a bit, but not too much. Next, use the side of your leg to try and rock the toilet back and forth. It should be very firmly bolted down. If not, the wax seal will likely develop leaks.
- After your wiggle test, try reaching under the tank and feel the connection bolts for moisture that may be leaking due to a loose connection. Don't worry, you planned on washing your hands after this, right?
- You can test for slow leaks using a dye tablet placed in the top tank. Place the dye in the tank and wait for 15 minutes. Dye leaching into the bowl itself indicates a bad tank seal.
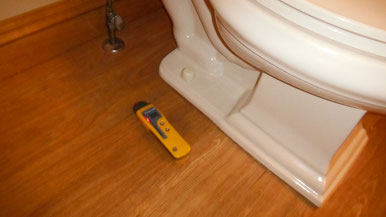
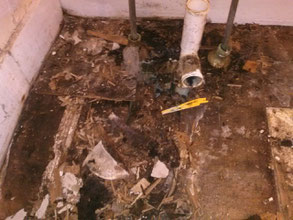
- If you are lucky enough to own a moisture meter such as the one pictured above (reliable ones are not cheap), check the under floor moisture levels surrounding the toilet. Invisible leaks due to a bad wax ring seal can be rotting out your subfloor and show no evidence on the surface.
- Gross. Wash your hands.
These quick checks will give you a good idea of whether or not you have any toilet issues. Pretty simple, really. A few minutes spent getting to know your toilet could save you money and heartache down the road, leaving your mind free to engage in more fulfilling bathroom reflection.


Write a comment
wordpress (Wednesday, 17 April 2013 05:15)
Great wordpress.com
Staten island home inspectors (Friday, 04 April 2014 20:25)
Omg, what happened to that water damage? It needs serious repair or replace all together.